• blog
  • about
  • Email List
  • Archives
Menu

HAZEL HAUS

Street Address
the best things in life are edible
Phone Number
A Food + Travel Blog

Your Custom Text Here

HAZEL HAUS

  • blog
  • about
  • Email List
  • Archives

Rhubarb Berry Crumble Bars (Gluten-Free + Dairy-Free)

May 6, 2024 Jenna Hazel

Rhubarb continually steals my heart. The tartness it brings just makes me really, really happy It makes me happy. So when I stopped in a new Micro Market last weekend and saw some rhubarb, I immediately snatched some up and started dreaming up a dessert for some friends that were coming over. Classically strawberries pair really well with rhubarb, but I had a variety of mixed berries on hand so I decided to go that route and it was a great move. These bars come together quickly and feel just indulgent enough to call a dessert, but could easily be excused as a quick breakfast if paired with some yogurt. I hope you all enjoy!

RHUBARB BERRY CRUMBLE BARS

Adapted from Ambitious Kitchen

For the crust and crumble:

  • 3 cups gluten free oat flour

  • 2 cup old-fashioned rolled oats

  • 1 cup packed brown sugar

  • 1 teaspoon ground cinnamon

  • 1/2 teaspoon baking soda

  • 1/2 teaspoon salt

  • 1 cup coconut oil, melted

  • 2 teaspoon vanilla extract

For the filling:

  • 3 1/2 heaping cups fresh or frozen mixed berries

  • 1 1/2 cup rhubarb, chopped

  • 6 tablespoons pure maple syrup

  • 3 tablespoons cornstarch

  • 1/2 teaspoon vanilla

  • Pinch of salt

Preheat the oven to 350 degrees. Grease a 9x13 inch pan with nonstick cooking spray to prevent sticking.

Make the base + topping: In a large bowl, use a fork to mix together the oat flour, oats, brown sugar, cinnamon, baking soda and salt. Add in melted coconut oil and vanilla extract and stir until a nice crumble forms and dough begins to clump together. 

Place 2/3 of the mixture into the prepared pan and place the remaining mixture into the fridge. We’ll use that for the topping. Use your hands to evenly press the dough to the bottom of the pan.

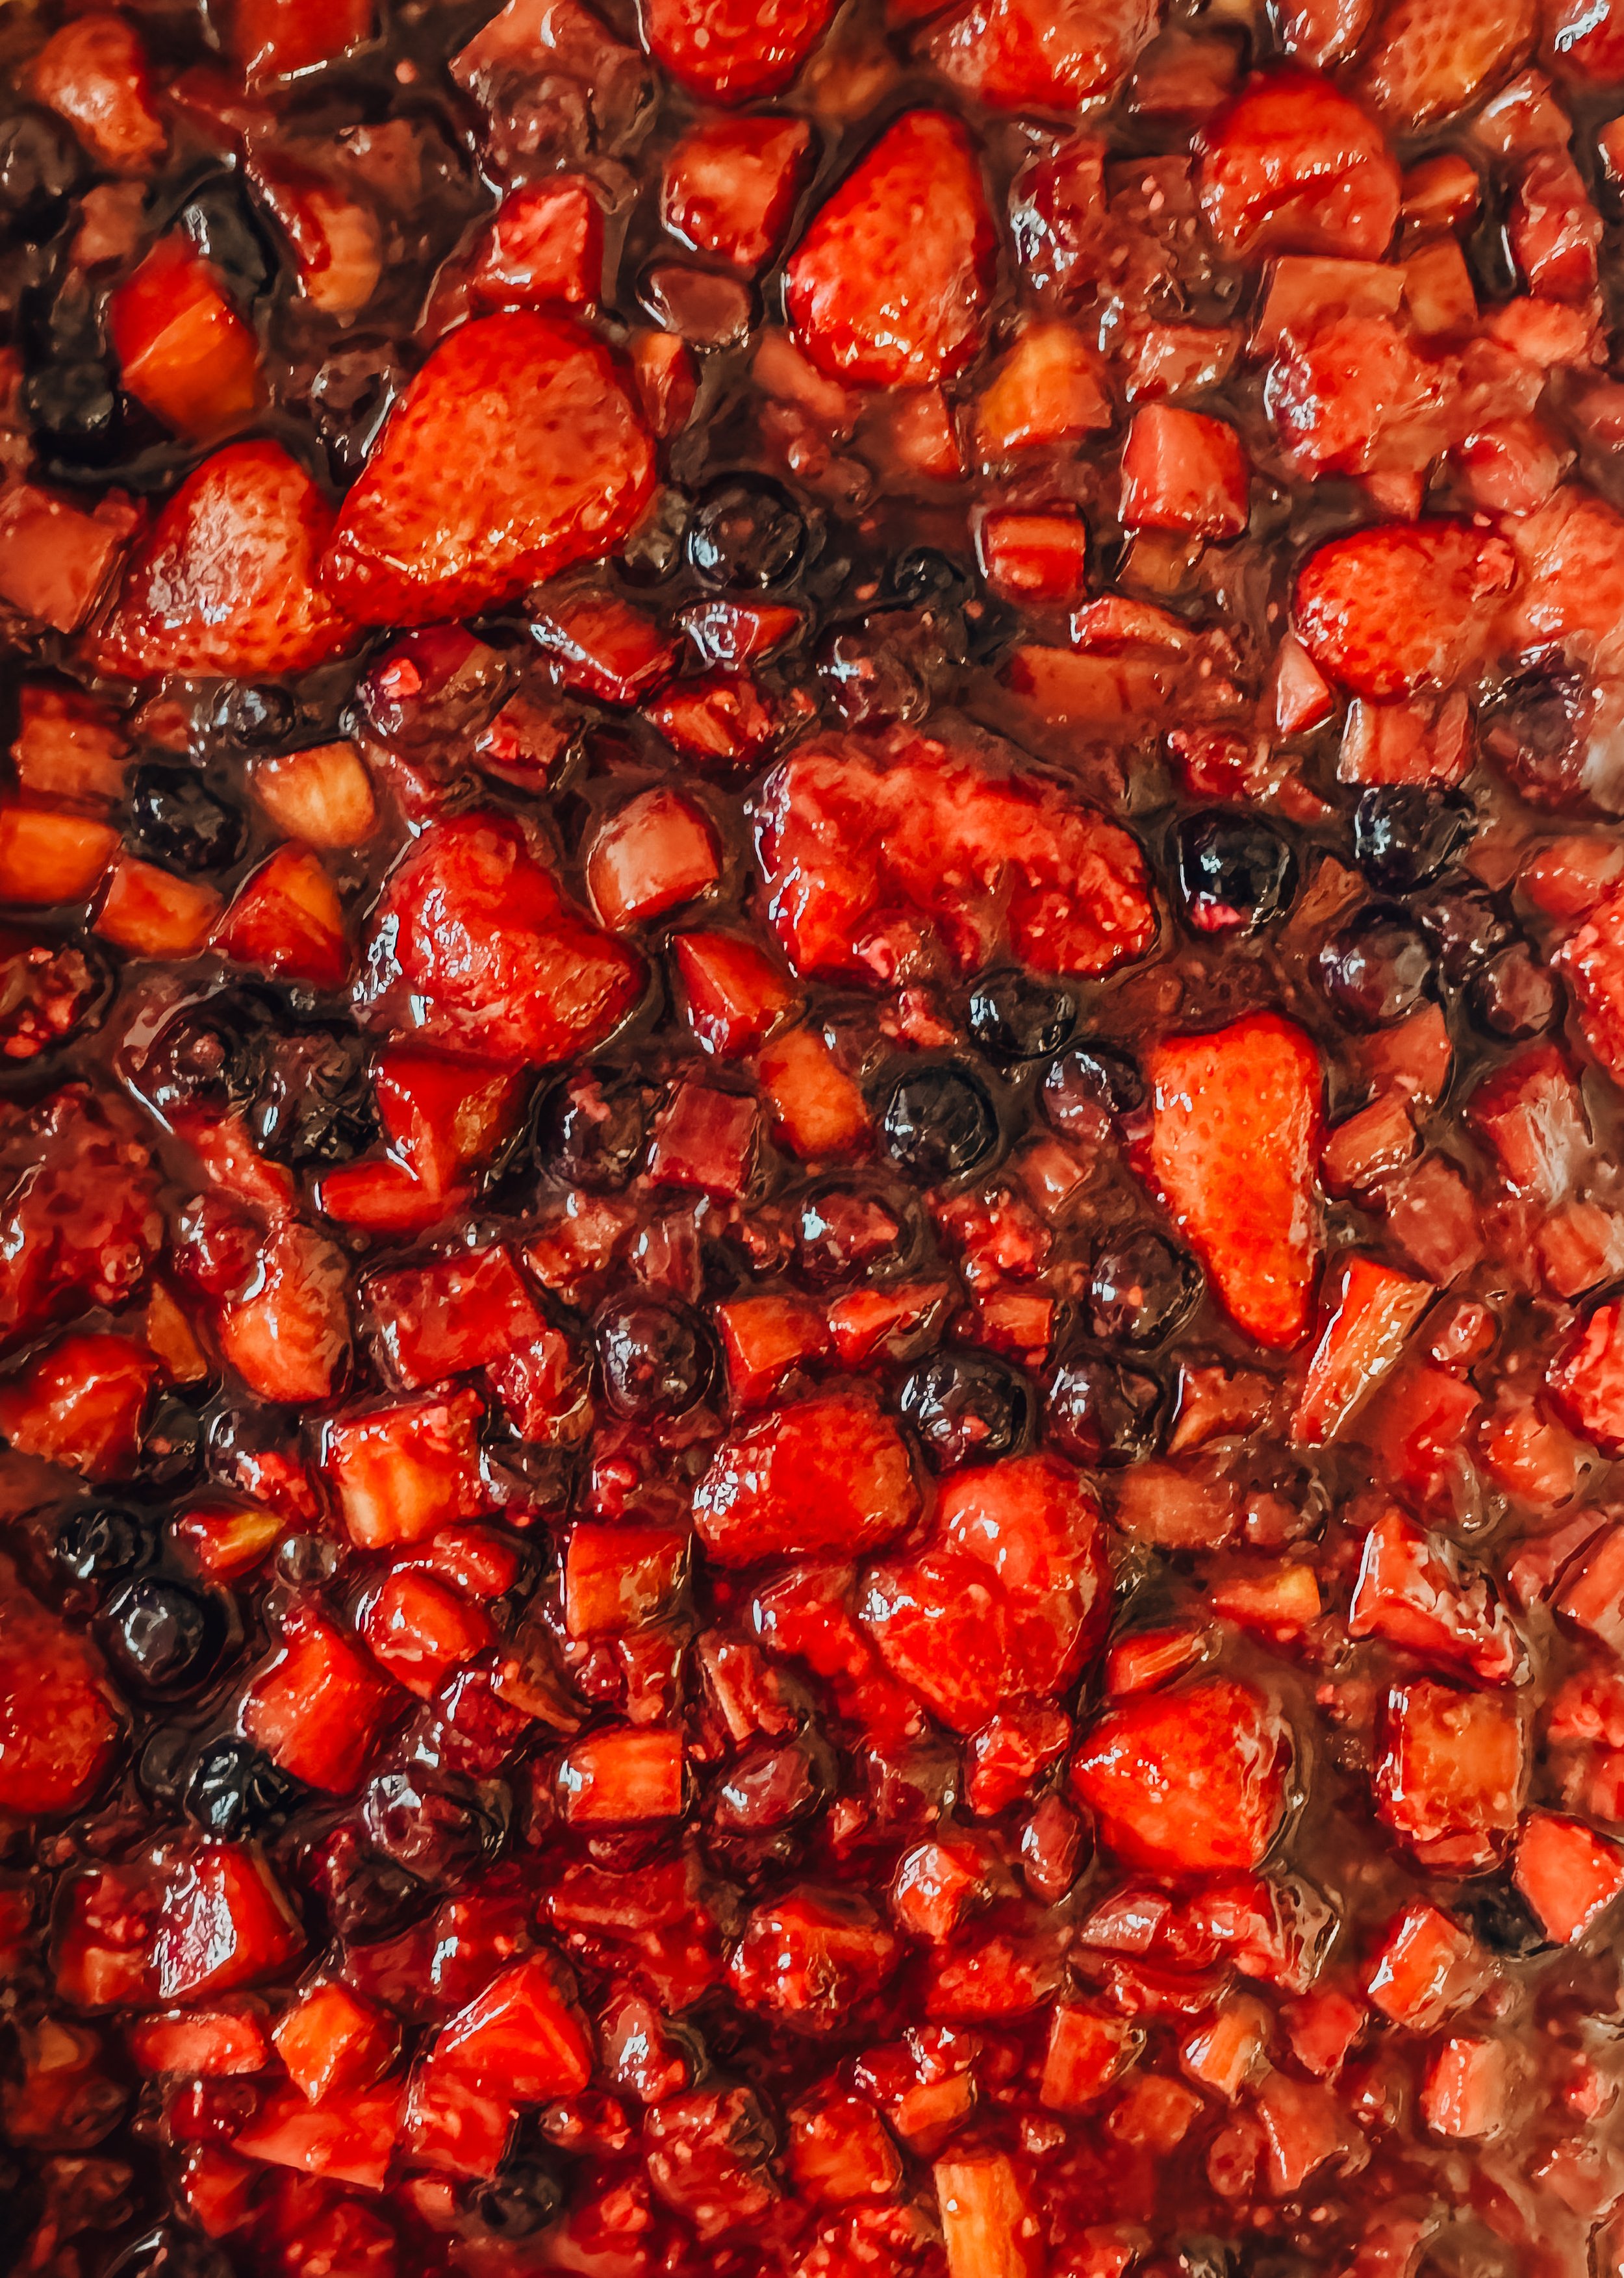
Make the filling: Place a medium pot over medium heat. Add in the rhubarb, berries, maple syrup, vanilla extract, cornstarch and salt. Use a wooden spoon to press down and break down the blueberries just a bit. 

Bring to a boil, then reduce heat and cook for 3-5 more minutes until mixture is thickened up and nicely coats the back of a spoon. 

Pour mixture over the crust and use a spoon to evenly spread.

Bringing it all together: Take the remaining topping out of the fridge. By now there should be some nice crumbles that have clumped together. Sprinkle the topping over the rhubarb-berry filling. 

Bake for 30 minutes or until filling is bubbly and topping is golden. 

Allow bars to cool completely on a wire rack before transferring to the fridge to chill. Bars are delicious served at room temperature or straight out of the fridge. Use a sharp knife to cut into bars before serving.

The bars are delicious served at room temperature or straight out of the fridge. I recommend storing in the fridge for optimal freshness.

In Food: More Sweet Things
Comment

Veggieful Cold Noodle Bowl with a Mango Peanut Sauce

April 28, 2024 Jenna Hazel

Cold noodle bowls are a great option as the temperatures begin to rise and you want something quick and refreshing for dinner. My goal with these bowls is to always balance the noodle content with veggies so that it doesn’t solely become a carb focused meal. Although I personally love kale, any greens could be swapped out to work for this bowl. The same goes for the sweet potatoes and cucumbers. You could use peppers or shredded carrots if you prefer. The real star of this bowl is the mango peanut sauce so if you can whip that up, the possibilities are endless. It’s not super sweet, but it’s incredibly delicious. It pairs perfectly with the veggies and noodles to create a really satiating dish that is easily adaptable with whatever you’ve got in your fridge.

Veggieful Cold Noodle Bowl with a Mango Peanut Sauce

Makes 4 bowls

Ingredients

  • 1 bunch of kale, de-stemmed and chopped

  • 2 large sweet potatoes, diced

  • 1 small cucumber, sliced

  • 1 avocado, quartered

  • 8 ounces of rice noodles or buckwheat noodles

  • 2 tablespoosn olive oil, divided

  • 1 teaspoon salt

  • Protein of choice (tofu, chicken, chickpeas, etc.)

Mango peanut sauce:

  • 1/2 cup frozen mango, thawed 

  • 1/3 cup peanut butter 

  • 1 1/2 tablespoon apple cider vinegar or rice vinegar

  • 1 tbs olive oil 

  • 1 tablespoon cilantro 

  • Salt 

Make the Noodles: First, cook your noodles of choice according the the package directions and then run the noodles under cold water to ensure that they don’t continue cooking. Set aside.

Roast the Potatoes: Preheat the oven to 400 degrees. Toss the diced sweet potatoes with 1 of the tablespoons of olive oil and then transfer to a large baking sheet. Sprinkle with salt. Place in the oven and bake until the potatoes are tender — about 25-35 minutes.

Prep the Kale: Toss the chopped and destemmed kale in a large bowl and drizzle 1 tablespoon of olive oil and sprinkle a little salt on top of the kale. With your hands, begin massaging the kale for a few minutes until the kale feels more tender. This only takes about 2-3 minutes.

Make the sauce: Because I despise cutting mangos and it can be tricky to ensure they are perfectly ripe at the exact moment you need them, I love to use frozen. Prior to making the peanut sauce I would recommend taking the mango out of the freezer and allowing it to thawTo make the mango suace go ahead and Combine all mango peanut sauce ingredients in a blender and process until completely smooth.

Assemble the bowl: Place the noodles, about 2-3 tablespoons of the mango peanut sauce (depending how saucy you like it), sweet potatoes, cucumber, avocado, and protein of choice in a bowl.

In Food: Main Course
Comment

Whole Wheat Sourdough Discard Banana Muffins with Toasted Pecans

April 20, 2024 Jenna Hazel

Phew, that may be the longest recipe title I’ve used to date. BUT I feel equally excited about all of those elements of the recipe that I felt like I had to just lay it all out there at the beginning.

These muffins were born out of my necessity to get rid of 200g of sourdough starter as well as 5 very ripe bananas — both common things I find myself in abundance of.

I opted for a muffin, but this could have definitely been turned into a cake with the addition of a lightly sweetened cream cheese frosting, BUT to keep the recipe nutrient dense I kept them as muffins and opted to use whole wheat flour. Specifically I used Sunrise Flour Mill Heritage Whole Wheat Flour because it is more nutrient dense than traditional whole wheat flours. Heritage wheat is more digestible which is great for everyone, but espeically those who struggle to process gluten normally.

To give the muffins texture I wanted to add some chopped pecans, but once I started chopping them I remember that the only thing better than a regular pecan, is a toasted pecan. So I toasted the pecans in the oven. It only took an extra 10 minutes, but helped build more flavor.

The last thing I did was ferment the batter by leaving it in the fridge for 24 hours prior to baking it. This allowed the batter to build up a more complex flavor profile and break down some of the gluten in the bread — making it easier to digest.

I hope you like this recipe and find it to be a nice option the next time you find yourself with a lot of sourdough starter and a lot of bananas.

Whole Wheat Sourdough Discard Banana Muffins With toasted Pecans

Makes 18 standard size muffins

  • 200g sourdough discard, does not need to be active

  • 2 eggs

  • 1/2 cup honey

  • 1/2 cup unsweetened applesauce

  • 5 very ripe bananas, mashed (It’s imperative that these be really ripe to provide adequate sweetness)

  • 1 teaspoon vanilla

  • 1 1/2 cups (200g) whole wheat flour, I like to use Sunrise Flour Mill Heritage Whole Wheat to maximize the nutritional value

  • 2 teaspoons cinnamon

  • 1 teaspoon baking soda

  • 1 teaspoon baking powder

  • 1 teaspoon salt

  • 1 1/2 cups pecans, chopped - reserve a few for topping the muffins

Step 1) Mash bananas in a bowl until they are smooth.

Step 2) Mix the sourdough starter, 2 eggs, honey, vanilla extract and applesauce in a bowl. Whisk together until well combined.

Step 3) Stir the mashed banana into the liquid ingredients.

Step 4) In a separate bowl mix together whole wheat flour flour, salt, cinnamon, baking powder, and baking soda.

Step 5) Now pour the liquid ingredient mixture into the dry ingredients. Gently fold together until just mixed. It’s important not to overmix or the muffins will be tough instead of the nice tender texture we are going for.

Step 6) Place the mixture in the oven overnight or up to 24 hours. This step is optional, but I like the sour flavor that the overnight fermentation imparts to the muffins. I’ve baked it without letting them set overnight

Step 7) Preheat oven to 350F. Place muffin tin liners in a 12 hole muffin tin. Spray muffin liners with avocado oil to prevent the muffins from sticking.

Step 8) Remove the mixture from the oven and spoon into greased muffin tin, filling each muffin tin 3/4 of the way. This recipe will fill a 18 hole muffin (each hole around ¾ full). Sprinkle each muffin with a few of the remaining toasted pecans.

Step 9) Bake at 350F for approximately 18 to 20 minutes or until muffins are golden brown. My oven tends to run a bit hot so yours might not take quite as long.

In Food: Bread, Food: Breakfast, Food: More Sweet Things
Comment

Herby Yogurt Plate + How I Approach Building A Balanced Plate

April 14, 2024 Jenna Hazel

With nourish being my word for 2024 I’ve been striving to find sustainable ways to hone in on that. For me, the key to be sustainable when it comes to nutrition is balance.

Let me preface first by saying, I don’t have it all figured out. Believe me, if I did, you’d be the first to know, but I’m taking what I’ve learned and seeking a way of eating that fuels me to live the life I want to live.

A little background, when it comes to nutrition, I’ve been on both extremes. I’ve lived a life where my whole life revolved around “healthy” eating (low-carb, limited calories, etc.) and I’ve lived another (more recent life) where I was focused more on indulgence (if I want it, I eat it.) In those extremes I learned a lot of what I didn’t want. In my “healthy” extreme I learned that I didn’t want to feel like I was starving all the time. In my indulgent extreme I learned that my body aches when I don’t prioritize protein and reach for ice cream consistently. Both of those are really valuable lessons! With what I’ve learned, I’ve begun to move forward and try to strive for balance. I’ve moved towards a way of eating that makes me feel really, really good and doesn’t leave me starving.

This yogurt plate feels like the perfect example of balance to me. Here are a few things I considered when building this yogurt a plate that I hope you find helpful.

How I approach Building a Balanced Plate

When I’m building my plate there are four things I’m always looking for.

Protein - I strive for 20g-30g per meal, but if that sounds too advanced to calculate/track just focus on making sure that you have protein present (chicken, yogurt, tuna, steak, legumes, tofu, etc.). This should be about 25% of your plate.

Fat - Fat helps increase satiety and leave you walking away feeling more satisfied with your meal than if you didn’t have any fat. The most common way that I add a little fat to a plate is to drizzle olive oil on the vegetables and then sprinkle with a little salt. Another way is using olive oil or coconut oil to roast veggies. Although fat is important, you don’t need a lot of it to feel the satiety benefits. Aim for about 1 Tablespoon with your meal. Also, ensure that you’re not using canola oil, vegetable oil, or other processed oils that are actually more harmful than beneficial. Olive oil, avocado oil, and coconut oil are all good options. I also enjoy using nuts or seeds to add some fat — pumpkin seeds have been a recent favorite.

Carb - Carbs get a bad reputation. I could probably write an entire blog post about this, but for now just know that it’s okay to have carbs — especially if they’re complex carbs and paired with a protein and fat. When they’re paired with that protein and fat then the body won’t process them as quickly which means that they are more likely to keep you fuller longer. The carbs I strive to add to my plate are whole grains (oats, brown rice, farro, quinoa, whole wheat bread, etc.) as they are more nutrition dense than things such as (white rice, white bread, etc.) and they are metabolized more slowly in your body so you won’t get that blood sugar crash that the less nutrient dense options will give you. Although carbs are valuable, you don’t want to mainly consume carbs. You’ve got to leave room for the protein, fat, and veggies. Carbs should be about 25% or less of your plate.

Veggies - Last, but certainly not least is veggies. I generally try to make about 50% of my plate consist of veggies. They have lots of nutrients that are important, but also lots of fiber that will help keep you fuller longer. I get it though, veggies can get boring. One of my favorite ways to get out of a rut with veggies is to go to a new grocery store and see if I can find some fun options that inspire me. Some of my top current vegetables are purple sweet potatoes and watermelon radishes.

BONUS: (But also super important!) The last thing I look for when building a plate is flavor opportunities. I am always seeking ways to make a balanced and nourshing meal taste really great. For this particular plate pictured above i knew I wanted to use some yogurt so I started adding herbs and garlic to bring the yogurt to life. Other things i like to add to increase the nutrition and also flavor or a plate like this is to add kimchi, hot sauce, saurkraut, pickles, a drizzle of kefir, etc. These additions will keep your meals more interesting and make you more excited to keep eating healthy.

Your Turn

I hope you now feel empowered to build a plate that feels balanced and nourishing! Below I’ll share the recipe for the herby yogurt I used to build the plate pictured. Again, I don’t have all the answers, but this is how I’m seeking to find balance as I strive to nourish my body and live a vibrant life. This formula has been helpful to give me a little struture while still maintaining freedom to get creative and enjoy food.

What’s on the plate pictured?

  • Herby yogurt (Recipe below)

  • Chicken meatballs

  • Watermelon radishes

  • Cucumbers

  • Tomatoes

  • Farro

  • A drizzle of olive oil and a sprinkle of salt

Herby Yogurt

Makes 4 servings

  • 1 cup whole milk greek yogurt — I really like this brand

  • 2 green onions, chopped

  • 2 tablespoons fresh cilantro, chopped finely

  • 1 tablespoon fresh dill, chopped finely (or use 2 teaspoons dried instead)

  • 1 garlic clove, finely chopped

  • 1/2 teaspoon salt

Combine all ingredients in a medium bowl. Spread onto a plate using a spatula or spoon and top with your favorite protein, carb, veggies, and fat. Enjoy!

In Food: Main Course
Comment
← Newer Posts Older Posts →
 

Hi! I’m Jenna — a creator, photographer, foodie, + travel enthusiast trying to bring some light and joy to this space! Welcome to my little corner of the internet where I share all things food + travel. Pour yourself a cup of coffee and take a look around!

GET ON THE LIST

Stay in the know! Sign up to be notified of new posts + get email exclusive content!

Your inbox will thank you.

Thank you!
To give Thanksgiving the respect it deserves I’ll keep the recipe for these slightly more Christmas-y cookies on lock down a week longer, but after that it’s free game. 🍪

If you’d like the recipe for these Rosemary Brown Butter Ch
A GIANT PUMPKIN POP TART WITH A BROWN SUGAR ICING is live on the blog! ✨

With Thanksgiving arriving in less than 2 weeks I’ve been dreaming up a dessert that feels like a good balance of both fun and tradition. This giant pumpkin pop tart brin
I had the best weekend eating (+ drinking) my way around Chicago! ✨ It always makes me so happy to be back in this city that grew me so much in my early 20’s — what a privileged to return and reflect on the ways I’ve grown and chang
NEW BLOG POST: Our favorite coffee, food, + sights in Omaha, Nebraska. 

There are truly so many places we love in Omaha! After living here for 6 years it felt like time to round up our top picks and share it with all of you. Hop over to the blog to
Fall in the neighborhood. ✨
Broccoli, couscous, pistachios, pumpkin seeds, + feta tossed with a lemon turmeric dressing for a nourishing lunch. ✨
A quick little 24 hour trip to hang with my mom. ❤️
Harissa chicken hummus plates ✨
Back on my Greek omelet kick! They’ve been such a great breakfast that has felt both fresh and nutritious! 

I added Kalamata olives, tomatoes, mint, basil, and feta in this time, but it could easily maintain the Greek vibe with some red bell p